- See also: Building for an overview of building (an introduction) or Building Guides and Tutorials for a variety of tutorials on different techniques.
This article provides you with an overview of the building tools. Many topics touched upon here may also be referred to as "build tools" and/or "advanced building tools" by some players.
Links within the page provide additional information, but the Related Topics near the end also offers a list of articles that may be helpful for new players if you prefer to read through this article first.
Overview[]
Building tools refers to a wide variety of User Interface (UI) elements are used to create designs on your build site or any site at which the owner has granted you access.
- Though this term primarily refers to tools used to add, delete, smooth an otherwise manipulate building materials there are other elements you'll want to familiarize yourself with that are described here, like the Materials Tray.
Building Terminology[]
Before you read on, it's helpful to know some of the common words used when describing the building process.
Build Mode[]
Build Mode refers to a player's ability to switch between a control schema for adventure and gathering tasks and all of the tools and features one uses to build. Build Mode includes the following tabs in one "mega-paltte": the Prop Palette (to place props), a way to tint your props, your actual tools to place and otherwise manipulate blocks and the Materials Tray (or palette), and any Designs you save.
- See the Build Mode page for more details and images.
Block[]
- Official DBG name for voxels
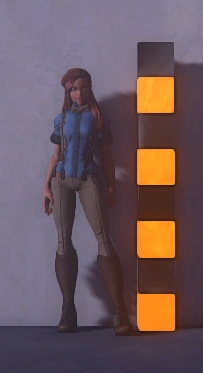
Above: a female avatar next to 8 stacked blocks for size comparison.
Block is a term used to describe the a single unit of material (in the form of the smallest cube) that can be placed with the Add Tool.
Before the game launch, this was referred to casually as a voxel, but the actual voxel is a point and complex structure inside of the smallest cube. The material that surrounds a single block can be warped and manipulated in various ways (eg. smooth tool).
In other words, this smallest cube is frequently used as a unit of measurement (akin to the use of meters in the real world, for example). To speed up the building process you may want to create a Voxel Board.
Designs[]
- Formerly called Templates
A design (or template) is a saved copy of anything that can be built in Landmark.
- From the moment you start playing, you have access to a set of starter castle pieces to help you learn about the building process.
- You can also create new and save designs of anything you build, from the smallest shape to an entire building on your build site.
- You can purchase designs made by other players from the Market tab of the Showcase. If the security access on a site is set correctly by a friend or community member, you can make design-copies of anything on the site.
- See the Designs page for more details.
Material[]
Before you can build with any gathered resource, everything you gather must be refined at a Replicator.
- For example, plain wood must be turned into Cut Plain Wood at a Replicator.
- In some cases, two or more resources may be combined to make composite resources (e.g. Smelted Mithril).
- Some resources are free and unlimited use. This is primarily defined by a limited collection of textures, most of which look like the natural terrain you see while exploring various biomes.
- Resource vs. Material:
Early in the game's development the difference between gathered resources for crafting and building materials was very distinct, which is how the term 'materials' gained popularity; however, now that all refined resources are used for both purposed, the words resources and materials are often used interchangeably.
- See the Building Materials page for more general details.
- See the Free-to-Use Building Materials for an explanation of this unusual building material type.
Texture[]
Texture or textures refers to any pattern or color variance materials can have in Landmark to represent a different appearance (ie. look and "feel"). For example, the material sand can be built with to look like formed sand bricks, polished sandstone slabs, the softer look of natural beach sand, and so on. You'll select a specific texture for each material in the materials tray.
Materials Tray[]
This refers to a manner in which players can see and select textures for building.
- The materials tray is folded into Building Tools tab of the Build Mode mega-palette.
- This term refers to an area within the UI that is used to choose between a wide variety of textures of building materials you use (smooth stone vs. stone pavers vs. bricks) while building.
- See the Materials Tray page for more details.
Terrain[]
The natural land (dirt, stone, etc.) that appears within the landscape of all biomes.
- The term became important when the developers added "free use" (unlimited) materials to the selection of building materials.
- All free use terrain will show with an infinity symbol (a sideways 8) in the materials tray are while in Build Mode.
- Because it is the most popular material of this type, see the Stone page.
Prop[]
A prop is any object the the developers have provided players with, to add final touched to anything we build. In many games these would be assigned the generic name 'furniture' even though house-themed items are only a fraction of the available props. Props are not built with blocks (a.k.a. voxels and they are placed using the Prop Palette tab of the mega-palette while in Build Mode.
- For example a chair you place using the Prop Palette is a true prop, as opposed to a chair you might create using the building tools.
- Props include a wide variety of options, they include static (un-moving) props, interactive props like doors, and even creatures your visitors can battle.
- This topic is broad. See the Prop Palette page for more details.
Enclose[]
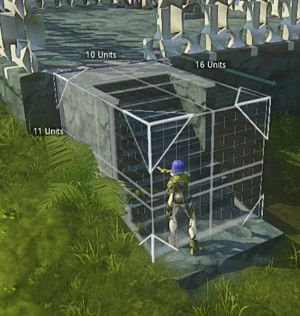
Shown above: using the Selection Tool to Enclose stairs while building.
Or the variations: enclosed or enclosing: refers to the actions using the Selection Tool, it describes anything (materials or props) within the area defined by the player while building.
Artifact[]
On occasion, the material around a block can be deformed in manner that looks spiky, or twisted in an unintended way. (e.g. When placing a sphere that is too small, artifacts may appear and make it look malformed.)
Fine Tuning[]
- Formerly known as Tweak Mode.
Many tools have useful keyboard shortcuts and commands that make building much easier when you use them. Most tools have some simple options and others have advanced controls that allow you to fine tune the placement the shapes and more.
- With the advanced controls, players can nudge and adjust a building tool with greater control. For example, you may want to make incremental adjustments to the location of the Selection Tool while building.
- Fine tuning can also be used when working with props from the Prop Palette.
- See the Fine Tuning page for more details.
Individual Building Tools[]
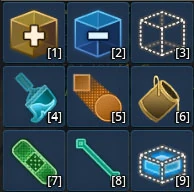
All of the build tools, found in Build Mode.
Below you'll find a summary of the basic purpose of each of the building tools you will get when you place your first build site.
- When you are on a build site and click on any of the building tools to activate it, you enter "build mode". Hit ESC at any time to release a tool (to switch tools) or to start another activity like placing props.
- Before you enter build mode, use the scroll wheel on your mouse to zoom in or out; doing so makes it easier to see what your doing.
- After you begin building, you can use CTRL + your mouse scroll wheel to zoom in and out.
Selection Tool[]
The selection tool serves the same purpose as a selection tool in most image editing programs or websites (think of cropping a picture), but in Landmark, it is used to isolate a area within a build site and make a wide variety of changes. It can be used to quickly delete portions the landscape in a build site, to change the look of any player built object (eg. wood stairs, changed to stone), or to smooth anything it is used to enclose. You will need to use it when you are ready to start making templates.
- It is the tool that may take the most practice to learn, but is one of the most useful because it can be used in many ways.
The Selection tool can be manipulated into any square or rectangular shape by:
- Clicking in the desired area to activate it to create a starting point
- Placing the mouse over either "handles" (small arrows on each corner) or any of a the "faces" (the flat sides), while holding down the L mouse button and
- Dragging the selection tool over the area you want to enclose for use with most other building tools.
- See the Selection Tool page for more details in uses, demonstration images, and demonstration videos.
Add Tool[]
The Add tool can be used to place materials on a build site. It can be scaled from a single voxel and up, provided you have enough of the material you intend to place. When you are satisfied with the size or shape, L click to place.
- If you do not have enough to of a material place at the time, you'll hear a clicking sound.
- When combined with the Selection Tool, activating the Add Tool and moving the mouse over the selected volume, the selection tool will turn yellow. Clicking a selected area will fill the entire volume.
- See the Add Tool page for more information, tips and tricks, demonstration images and videos.
Delete Tool[]
The Delete tool can be used to remove materials on a build site. It will delete both the natural landscape of the build site or remove any materials you've placed (eg. a staircase you built).
- When combined with the Selection Tool, activating the Delete Tool and moving the mouse over the selected volume, the selection tool will turn blue. Clicking a selected volume will remove the entire volume (eg. a tower you built prior).
- See the Delete Tool page for more information, tips and tricks, demonstration images and videos.
Heal Tool[]
The Heal tool can be used to return the landscape on a build site to its original state. For example, this grants the freedom to delete large areas of the build site without any worry. In the context of building tools you are "healing" the land.
- When combined with the Selection Tool, activating the Heal Tool and moving the mouse over the selected volume, the selection tool will turn Green. Clicking will heal anything inside. Unlike other the add and delete tool, the heal tool will not effect the entire volume of the selected area; instead it may heal and fill the whole selection tool volume (if the selected area was large) or it will heal the selection volume partially, based on the original landscape.
- Examples: it can heal a large underground area that was once solid dirt back to its original state, while the side of a hill will return with its natural curvature only and the airspace around it.
- See the Heal Tool page for more information, tips and tricks, demonstration images and videos.
Smooth Tool[]
The Smooth Tool will smooth any rough edges on a player-built object or on the natural landscape of a build site. If used too aggressively, it will remove too much material, so use it carefully. It is also used in many advanced building techniques (eg. creating inlays).
- When combined with the Selection Tool, activating the Smooth Tool and moving the mouse over the selected volume, the selection tool will turn purple.
- See the Smooth Tool page for more information, tips and tricks, demonstration images and videos.
Paint Tool[]
The Paint tool is used to replace a material or texture in a player-built object or the natural landscape on a build site with a different material or texture.
- This tool allows players to quickly alter the look of an player-made object after it has been built or after a template has been placed.
- When combined with the Selection Tool, activating the Paint Tool and moving the mouse over the selected volume, the selection tool will turn cyan. Any player-built object, structure, or the landscape within the selection volume will take on look of a different material selected by the player.
- You must have the material you want to apply in your inventory to make a change.
- Examples: enclosing staircase you built out of wood can be changed to stone (changing one material to a new material), selecting the wall of a house and changing from small stone bricks to large stone bricks (a texture change), enclosing an area of the landscape and changing snow to grass.
- See the Paint Tool page for more information, tips and tricks, demonstration images and videos.
Fill Tool[]
This tool allows you to choose an area with empty "air" and fill it with a material. For example, you have a building in which you have elaborate windows cut out.
- By combining this tool with the Selection Tool, you can fill only the negative space, without disrupting the shape of anything around it.
- Prior to the game launch Founders used a "putty" technique to achieve the same results.
- See the Fill Tool page for more information, tips and tricks.
Line Tool[]
The Line tool is used to build slopes, inclined pillars and various volumes joining two different surfaces. For example, a common use for the line tool is adding simple, straight support beams to a house. By holding down Y while working with lines, you can also use this tool to cut angles.
- To use it, you first click on one surface to indicate the beginning point and move your mouse pointer to the second point at which you want to complete the line. When satisfied with the placement, L click to fill in the volume indicated by the line tool.
- Color indicators help determine what to expect: green = a line that will be smooth and yellow = a line that will not be smooth.
- See the Line Tool page for more information and modes, tips and tricks, demonstration images and videos.
Area Tool[]
This tool is used with interactive props, like trapdoors. This tool allows builders to set an area on a build site to trigger an event with the Linking and Triggering system. For example, you can have a trapdoor open when a player runs over it, rather than when they click on the trapdoor.
- See the Area Tool page for more details.
Eyedropper Tool[]
This tool will not appear in you inventory. It is a tool that can be activated while using most other building tools. It's the key to quickly switching between building materials. When activated, it looks like a tiny ray of light. Press Alt when using the Add tool (or similar) to "sample" a nearby material.
- See the Eyedropper Tool page for details.
Overview of Keyboard Commands[]
The table below has the most common commands you will use. Check the individual tool pages for any additional pages or descriptions of these in greater detail. You can also consult the Modal Bar above you hotbar when a tool is active to see any keyboard shortcuts and additional modes for the active tool.
| Keyboard Command | Applicable tool and additional action | Purpose | Works with props? |
|---|---|---|---|
| Hold CTRL, use mouse Scroll Wheel | General building | Zooms the camera view in and out | N/A |
| Press CTRL + C | Selection tool, when a player-built object (eg. stairs) is enclosed | Copies an area that's enclosed within the selection tool area | Yes (same as player-built objects) |
| Press CTRL + V | Works with the last copied object (eg. stairs) | Pastes player-made objects/shapes | Yes, if props were in the copied area and player has them in inventory |
| Press CTRL + Z | Undo an action previously taken up to 20 steps back | All tools, all building actions. Allows for quick correction of mistakes and easy experimentation | Yes |
| Press CTRL + Y | Repeat ("redo") all actions from using CTRL + Z (and prop adjustments) | All tools, all building actions. Allows for quick correction of mistakes and easy experimentation | Yes |
| C | Add tool, delete tool, heal tool, smooth tool, paint tool | Switches between a cube shape and the sphere shape | No |
| Mouse Scroll Wheel | Add tool, delete tool, heal tool, smooth tool, paint tool | Scales size of the tool (eg. 1 voxel cube to huge) | No, R click to activate the scaling of props |
| Press T | All tools except the selection tool, works with pasted materials/templates | Activates fine tuning, opens controls for slower/refined placement and scaling slowly | No, R click to activate separate scaling features for props |
| ESC key | Works with all building tools | Cancels the tool you are using/exits "build mode" | Yes, it can be used to cancel the placement of scaling of props |
About Advanced Building Techniques[]
- The offical term for voxel is now block to better describe the default shape of this when building with the add tool.
Besides the conventional voxel generated through the building tools there exist special types like micro voxels, anti voxel and zero voxels one can create ingame which allow more advanced building and higher detail grades. A list of other building guides can be found here and many more are available on YouTube.
Related Topics[]
If you are new to Landmark, you may want to read the following as well:
- Prop - props can also be placed on build sites while building and many players manipulate props to make unusual effects. For example, one might flip a cup upside down to create the illusion of a stove burner.
- Build Sites- If you've not yet read about build sites, make yourself familiar with how they work before placing your first build site.
- Gathering - will help you learn the basics of gathering materials to build on your build site.
- Crafting - will aid in understanding some of the steps you may need to take to refine materials that you can build with.
- Building - provides and introduction to the topic covered here in a general sense.
Possible Bugs[]
- The clicking sound that can normally be heard when you do not have enough of a material may still sound off when you do have enough. If this happens you might need to L click a few times to get the tool to work (eg. deleting with the selection tool, placing a large cube)
- Some tools may misbehave if you are scrolled in too close (in first person). For example, you may get stuck in tweak mode (shift + left click) or accidentally cancel the use of the selection tool without hitting ESC. To correct it, hit ESC, hold down Shift and use the mouse scroll wheel to zoom out before you build again.