- Formerly called Templates
- Note: some terminology changes (blocks instead of voxels) may not be accounted for below yet and some information may need updates.
Designs are the saved version(s) of a player made block objects (like furniture, or full structures like a cabin) using the building tools. They can include items like props.
The design "library" holds all of the designs a player has saved, any that are purchased via the Showcase, and sets of starter designs that were crated by the Daybreak team to help new players learn to build.
Overview[]
Designs are saved in-game on the company servers only and no local copies exist on the players hard disk.
Designs and Materials[]
All textures using common dirt, stone, sand, ice, and snow are now "free" to build with, meaning that when used for building and placing designs, they do not need to be mined and their use for building is unlimited.
All designs that use any materials outside of the "free" materials must be in your inventory before you can place the design. For example, you must go and mine and process diamonds into Cut Diamond first if the design you want to place uses any, as it is not a common material.
Designs can be created with props, but you need to have the materials in your inventory for the props to appear when you place the design again later.
Access and Use FAQ[]
- Your design library can be accessed by pressing L on the keyboard.
- Pressing the ESC key at any time during placement will cancel the placement action.
- Pressing CTRL + V will bring the last design back up again if you just used a design and have not exited build mode on your build site.
Uses[]
- Designs allow players to quickly duplicate entire structures, portions of structures, or smaller objects like an archway. For example you may create a small building to hold crafting stations, a unique window or archway. The building could be placed on another build site you own later, while the window or arch might be used on one or more project you're working on.
- Creating and placing saved designs allows player the freedom to experiment on their own built structures without worry that they will ruin progress; a design remains as it was when it was saved until the player decides to delete an older design and save a newer version. In other words, you can place several duplicate staircases, experiment with the building tools on each one, and only save any changes you like.
Design Storage Limits[]

In 2016, Design Expansion can be "purchased" using Lumens. (Click to enlarge)
Each player can create a limited number of designs based on the number of blocks it includes.
You can tell what your limit is by pressing L and looking at the numbers in the top right of the Designs window. The left number is the number of blocks (voxels) you've used up, and the right number your current limit.
Most designs are created by building on your own build site or visiting a player-owned Swap to copy existing structures or shapes, using the Selection Tool.
- Designs have default storage limit of 6,000,000, but you can add more space.
- The limit can be increased by 6,000,000 units for 1040 Lumens from the Lumen Station.
- The maximum upper limit is 48,000,000 units.
- The storage limit can increase at any time, so check the Lumen Station for current limits.
- Once you reach the maximum expansion the option will not show in the Lumen Station.
Expanding Limits[]
- Use the Lumens you earn while playing or
- You can use Lumens you buy from the Marketplace tab of the Showcase.
If you want to expand your storage, open the Lumen Station to buy the storage increase using Lumens.
Deleting Saved Designs[]
To assure you don't waste space, do a bit of "housecleaning" by pressing L and deleting designs you saved, that you no longer need or want.
To delete designs, press L to open the window with the list. Deleting them will open up storage space when you need it.
- The starter castle and any designs you buy from the Marketplace tab of the Showcase do not count toward the limit, so there is no reason to delete them, even if you don't use them anymore.
- Designs created automatically by the game system when you delete a build site or a build site expires can exceed block storage limits; however, to save new designs you must delete designs you no longer want or need.
- See the Designs page for more on general information on the topic.
User Interface (UI) Modes[]
In order to understand the features and functions described below, understanding the basics of the UI windows is necessary. Each window described in this section have slight differences which offer advantages.
Mega Palette Designs Tab[]

The Designs tab (click to enlarge).
The mega palette is one part of a large UI window players access while in Build Mode. The mega palette covers the full length of your screen. It offers easy flip-through access to all of the tabs used to build in a fixed size.
The advantage of this mode is that it is easy to see more designs at once and to scroll up and down through the list. It features a search field on the upper right side, so you can find designs by their names.
Designs Modular Window[]

The Meshes window as it appears in the summer of 2016.
Modular windows for Build Mode make it easier to limit "screen clutter" while you are building
- Modular windows are smaller than the single mega-palette (one huge window) and they can be resized.
- The modular windows can be moved anywhere on the screen.
- You can open one of these or all of them at once.
- Accessing Modular Windows:
After you open Build Mode, the mega palette can be minimized to reveal to open/close tabs for the build mode modular windows.
- Click the down arrow on the far right.
- When the mega palette disappears, click on any of the tabs for the modular windows you want to access and use.
Designs Library Window[]
This window is opened by pressing L on your keyboard. It is best used when you want a top-to-bottom list of designs or if you want to sort them by any of the following factors:
- Creator
- Date Created
- Voxels (size)
Creating Your Own Designs[]
Once you are satisfied with something you have built or find something on a copy-only swap that you want to design:
- Open Build Mode by clicking on the Tools icon in the upper right corner of your screen or by pressing Tab.
- Use the selection tool to enclose the new design object.
- Click on the + button below the Manage Designs button, to open a secondary window.
- You can take up to four screenshots of the design; when you do, the area around it will black out to isolate the area you have selected. Hold down CTRL and use scroll wheel to zoom in and out so you can see it clearly in your screenshots.
- Click the camera icon to take each pictures. To assure you understand what the design is, move around the selected area to get a variety of screenshots.
- Give the design a name that is both easy to remember and easy to find using the search feature in the design window later.
- Click the Create button to save it.
- The same process applies to any design a friend has offered to let you copy and design, but see the section on block ownership for important details.
- Do NOT use any special characters (% or $ etc.) when naming designs.
- The design will appear in the Personal list when you are looking for them later.
Remember to save designs often while experimenting! They can always be deleted later.
Naming Conventions[]
Creating a naming convention for your designs can save you a great deal of time when you have many to choose from later on. For example, rather than naming several designs "stairs" add some identifying feature or style indication to the name. Later, you find it among all of your stairs or if it is part of a themed build you can find it using that terminology instead. Exmaples of why this is useful:
- In a new location, you may have a general style that suits a new building project. For example, you may a set of curved stairs that works well in more than on design.
- A naming convention is also useful when working on different themes for use in more than one location. For example, you may want to use parts of a dwarven themed keep in another location and being able to search using the word "dwarven" in the name could help you find a tower, a gate, a staircase, and a throne to use later.
Placing Designs[]
- Note: the control schema for building was changed late in closed beta, therefore the info below may be out-of-date. Please check this while in game and update this wiki accordingly. When verified, please remove this note.
The action to place a design is fairly straight forward: once you choose a design, L click on it. If you are satisfied with the location, L click again.
If you have used good naming conventions (described above) you can use the Search field in the design library window to look for them by name. Otherwise, they are listed in alphabetical order.
- Requirements:
- In order to place any design, you need to have the building materials required.
- If you are using the starter castle or a design previously saved using the "free" Terrain materials you do not need to gather resources.
- See the Building Tools section for an expanded explanation of "free" Terrain materials.
- If you do not have the resources you will hear a clicking sound when attempting to place it.
- If you mouse over a design and R click a window will open that gives you a full list of required materials in a larger window.
- If a design turns red when you are trying to place it, it is outside of the boundaries of the build site.
- Tips and Tricks:
- The larger the design, the longer it can take for it to load all of the data to place it. Be patient! When it has loaded your character's arm will show as held up in the air and a large yellow shape (the outline of the design) will appear.
- If the design includes any props, you will be able to see them within the yellow shape. Such props can be helpful when orienting or aligning the design before you place it. For example, doors can be a guide to help you decide which direction to turn the design.
- Designs that include props can be placed with those props if one has the resources used in when the design saved.
- With the introduction of the Prop Palette (props are no longer crafted), you only need to have the resources in the materials tab of your inventory. If you lack the materials used for those props, the design will still place, but those props will be missing.
Removing Placed Designs[]
If you place a design but are not satisfied with its location or orientation immediately after placement, press CTRL + Z to undo the placement.
- Removal by the technique above will remove the entire design and any props it included. All materials will be returned to the materials tab of your inventory automatically.
- If the design includes props you would like to pick up first (like the crafting tables included in starter homes), right click on each prop to pick them up. Picking the props up will place them in the bag tab of your inventory so you can place them manually again later. Doing so is only necessary if you want to build a new structure, rather than placing the same design again.
Should you elect to remove a design long after it has been placed, you have the option to pick up props separately or remove them all at once.
- You can use the Selection Tool to enclose the entire build site and the Delete Tool to remove all block materials at once, which leaves props in-place. This is useful if you'd rather adjust props slightly or if the props are not found in the Prop Palette (like crafting stations)
- You can use the above technique and then use the delete key on your keyboard to remove all props.
Types of Designs[]
If you look at the list in Build Mode, you'll see many categories. This section focuses on types that are not defined by the list of those which may not be clear to new players.
Starter Castle[]
All players have a set of starter designs (castle parts) to experiment with when they create a new character.
- The starter designs do not count toward your block storage limit.
- To locate them, use the Designs tab in Build Mode and click on the Castle Parts list or
- Press T to open the Design library and type "castle" if you are working on building-themed goalss.
Starter Castle and the Journal[]
As of June, 2016 (game live launch) the Journal includes a goal, titled "Your Home is Your Castle". The goal asks player to place a portions of a castle using the Build Mode UI (user interface).
All players start with a build site pre-selected and ready for them on a Pioneer Landscape to make completing this goal easy, but the goal can be completed on any build site.
- See the sections that cover placing and removing designs above for tips and tricks to make this goal easier.
Founder's Designs[]
- The designs described here were retired in favor of adding castle parts; however, those who purchased Founder's Packs may still have them if they tested when this section's designs were added.
In May 2015, this collection of designs was moved to the Replicator where they are created at no material cost to players. This change was implemented to ease new players into building and placing designs by focusing on the Starter Homes first.
- The starter designs vary, but include the advanced shapes that tend to be more difficult to create when you are learning to build.
- The shapes come in a variety of sizes to experiment with and include arcs, discs, angled "lines", ovals, pillars, and triangles.
- Included are also a few fonts (alphabets) and the Landmark text-logo.
You can watch this 12 minute video about using (the old) starter designs (of arcs and other shapes) in the video, Tiny Tutorial - Starter Designs (Introduction).
Player Studio Designs[]
Players who choose to register to sell objects they build and make designs of can do so via Player Studio. After they are approved and available they appear on the Showcase, where other players can buy them. Though these designs can be altered by the players who purchase them, the can not be traded with other players.
Designs purchased from Showcase can also be used as many times as you see fit (just like your own designs) provided you have enough of the materials it requires to place. As of March 2015 you can now buy designs that include sets or special blocks. For example, you could buy a new alphabet and use individual letters.
As of March 2015, they can be altered with the using the Building Tools. For example, you can buy stairs made from wood and paint them with stone instead. Examples include (but are not limited to):
- Use the Selection Tool to copy and paste portions of a purchased design to build something new. For example, copy part of a tower to make a different building.
- Use the Paint Tool to change a texture from one material to another, like switching stone to wood.
- Use the Delete Tool to create new doorways and windows.
- Use the Add Tool to build a new porch on the front of a house.
- See the section Block Ownership to better understand how to see which blocks you own.
Expired and Deleted Build Sites Designs[]

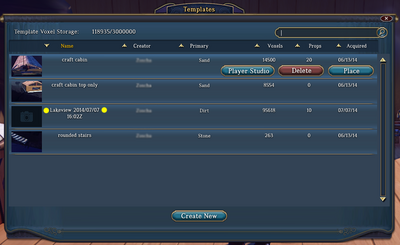
Above: The design library as it appeared during closed beta. Edited for emphasis, two yellow dots next to a deleted build site to mark the auto-saved design.
Any time you fail log in and maintain the time-upkeep for your build sites, it will be deleted from the landscape and all materials and items you had will be returned to you. A design of the entire build site, in state it was in when it when it expired, will automatically added to your design library. The same is true for any build site you choose to delete.
- See Build Site Management for details on time-upkeep, build site deletion and more, including helpful images.
Tip: to avoid the potential difficulty of using a design to place a very complex or large build site area all at once, it's wise to design sections of a build site you've worked on for a long time. For example, you may want to create "slices" and saves them with titles that describe the slice location (eg. Build sitename Left Side, Build sitename Center or Build sitename North side) or save the key aspects of the build site in case you need to start over in a new loaction (eg. castle tower, castle gateway, castle dungeon, etc.)
Block Ownership[]


Above: the build site info drop down that can be opened while standing on your build site. Edited and applicable on this page: #4 in yellow marks the Voxel Vision button.
- Though the principals of the info this section still apply, descriptions of the UI may be outdated. Please verify and update.
With the addition of addition of the Player Studio to the Showcase, any block placed or altered by a player now assigns "ownership" of that block to the player. This is to assure that those who want to sell designs via Player Studio have their work protected from random copying. This applies to objects you design and build (eg. a bed or boat) and any terrforming in which you've altered the natural landscape on a build site.
- Players can still copy each other's designs freely if granted adequate permission on a build site; however, they can not sell those designs in part or in whole unless the original owner has registered to use Player Studio. Any designs put up for sale that include multiple block owners will divide the profits accordingly. For example, if Tom made a design and Harry used a 10% of that design's blocks to make a new design, Tom will still get 10% of the profit for all sales of the new design. (See the official Player Studio FAQ for a breakdown of how player profits are calculated.
Voxel Vision[]


Above: The (closed beta) Voxel Vision window open, the Builders list expanded with the only two builders checked. The are of the build site is tinted to match the color next to their names.
- This section needs updates to suit the changes for the live game launch. Please take a moment to update it.
With the addition of block ownership a feature to see who has built which objects on any build site you own. To access the information, go to the build site and click on the build site information window that is at the top, center of the screen and click the Voxel Vision button. A secondary window will open with a list of Builders. Expand the list and check or uncheck the names of those who've built there to see their contributions. Each Builder will have a color next to their name and each block they own will be tinted in the same color.
The system is still fairly new and due to the nature of beta, see this Official Landmark forum post for details until the system is finalized.
Sharing Designs with other Players[]
There are two ways to trade designs with other players.
- If the design based on something you have built, the easiest way is to open the design library, locate the design you want to give to a friend, and press the Send to Inventory button.
- The Send to Inventory button will create a copy that can be traded in person by right clicking on another player, that can be mailed to another player, or that can placed in a storage chest for players to pick up if they have the correct security access for your build site. The icon for a design created this way is similar to the icon for a Row of Heavy Books.
- Another way to share designs is to create a build site that is set to Copy-Only access for visitors. Build sites of this kind are known as Swaps. You can read more about swaps on the page that describes the use of Voxel Board (often called shape boards). To learn more about security access levels (including Copy-Only) see the Build sites page.
- See the Swaps page for more info.
Video Tutorial[]
- This video uses old terminology info but it may still be useful, so it is being retained while updates are made.
- Outdated terminology: Template instead of Designs and voxel instead of blocks
- Instead of the Build Mode UI and windows it used the old (but still accessible) Design library window.

Related Topics[]
- Voxel Board - a specific type of template that has a wide variety of unusual shapes that are useful for building.
Potential Bugs[]
- On occasion, very old templates from Alpha may not look the same when placed, due to the way blocks interact with each other in the game after a late-July 2014 update.
- Some templates may not have preview images if: 1) they were created long ago in closed beta 2) they were auto-saved and a screenshot of the Build Site was never taken.
- Templates created long before the Player Studio was introduced may not have any assigned block ownership, allowing anyone to copy them and sell them on the Player Studio later.
- When using the modular, compact version of Build Mode, for may need to reopen the full size User Interface (UI) window and clear any prior searches. The modular mode will not show the keywords and you can not clear it from there. For example, if you searched for cabin, you would only see templates with cabin in the name while in modular mode, until you open the full sized Build Mode mega palette, delete the word, cabin, and refresh the search by hitting the magnifying glass.