- Sometimes referred to as the mega-palette
Build Mode refers a special collection of UI (User Interface) windows a player can toggle open in order to access everything they need to use while on any build site.
Overview[]
You can toggle Build Mode on by either clicking the Tool icon in the upper right corner of your screen or by pressing Tab on your keyboard. Build Mode opens as a mega palette (one large window with tabs) by default, but players can use modular build mode windows to minimize "screen clutter".
Build mode was designed to free up inventory space, while also making it easier for players to access each element they need while building and to prevent screen clutter while carry put both building tasks and when one wants to adventure or explore instead.
Players can also use a search feature to find what they need within any of the various tabs. For example, one could search for all chair props with that tab selected.
The Mega Palette has tabs, described in sections below to introduce players to their general purposes and use. Near the end of the page you will find the directions to open the Modular Build Mode windows. The Modular windows are simply compact, movebale version of each of the tabs found in the Mega Palette.
Mega Palette Overview[]
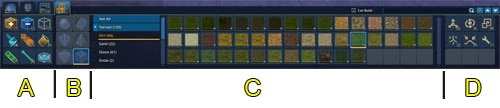
See the image labeled with letters for reference. Each area of the build mode tray serves the following (general) functions:
- A - depending on the tab you have selected, this area will give you access to lists of designs, props, and the icons to click to use the actual Building Tools
- B - this area will expand and collapse for all but the Building Tools tab, but is shown here to indicate the locations of the Shapes tray. Clicking on these will allow you to work with a variety of shapes beyond the common blocks.
- C - depending on the tab you have selected, this area will show previews and names of designs, previews of props, the actual tints you can apply to some props, or with the bluilding tools tab active, the materials you can choose to use. For example, you can select the material, copper, in this area and when you place a block with the Add Tool, it will be made of copper.
- D - this area will allow you to see any relevant keyboard short cuts to fine tune or "tweak" the placement of designs, props, and blocks.
- Note that you can switch between keyboard shortcuts to achieve desired effects. For example, you might press Z to switch between the different axis of a prop, then press E to rotate it on that axis. The best way to learn which keys to combine is simple to experiment until they are a habit.
Designs Tab[]


This tab allows players to access designs provided for free by Daybreak, any designs they purchase from the Marketplace tab of the Showcase (created by fellow players), or any designs they create and save.
- Once selected, this tab has the following sub-categories accessible from the left side of the screen:
- Starter Castle - this category contains all of the pieces needed to complete the very first Journal-goal, which guides players through the basics of placing designs in the world.
- Player Studio - contains all player-created designs that have been purchased from the Marketplace tab of Showcase using Daybreak Cash.
- Personal - contains all designs created by your character or saved (freely) with the right permissions granted on Build Sites by friends.
- Collected - contains any designs automatically saved through special discovery or those traded or mailed to you by fellow players.
Design Placement[]
Once you choose a design, L click on it. If you are satisfied with the location, L click again.
- It may take time for large designs to load.
- In order to place any design, you need to have the building materials required.
- If you are using the starter castle or a design previously saved using the "free" Terrain materials you do not need to gather resources.
- See the Building Tools section for an expanded explanation of "free" Terrain materials.
- If you do not have the resources you will hear a clicking sound when attempting to place it.
- If you mouse over a design and R click a window will open that gives you a full list of required materials in a larger window.
- If a design turns red when you are trying to place it, it is outside of the boundaries of the build site.
Design Storage Limits[]


In 2016, Design Expansion can be "purchased" using Lumens. (Click to enlarge)
Designs have storage size limit 6,000,000, but you can add more space.
- You can tell what your limit is by pressing L and looking at the numbers in the top right of the Designs window. The left number is the number of blocks (voxels) you've used up, and the right number your current limit.
This is done by either:
- Using the Lumens you earn while playing or
- You can use Lumens you buy from the Marketplace tab of the Showcase.
If you want to expand your storage, open the Lumen Station to buy the storage increase using Lumens.
Deleting Designs[]
To delete designs, press L to open the window with the list. Deleting them will open up storage space when you need it.
- The starter castle and any designs you buy from the Marketplace tab of the Showcase do not count toward the limit, so there is no reason to delete them, even if you don't use them anymore.
- See the Designs page for more on general information on the topic.
Props Tab[]


This tab was formerly a separate UI element, known as the Prop Palette.
- Using this tab, player can access and place any prop they have the "recipe" for, provided they also have the correct materials on hand.
- For example, a bed prop might require you to have 100 wood (of a specific type). If you have 500 wood at that time, you could place 5 of those beds on your build site.
- Basic props are innate when you start playing, while many others can be discovered while engaging in non-building activities (e.g. gathering).
- Impatient players can also use the Lumen Station to "buy" recipes using Lumens they earn from non-building activities or using Daybreak Cash.
- The sub-category list for props is quite long, so be sure to scroll down to see the full list of props.
- You can search for props by name or you can use the "Can Use" check box to limit the props you see.
- See the Prop Palette page for more info on working with props.
Tints Tab[]


At one time, each prop was found in the palette in every color variation. Tints were added to allow player to "tint" a prop as they see fit and alleviate the need to have multiple props recipes that would have amounted to duplicates in many cases.
For example, players can place a Simple Stool and now change the color of the cloth seat, by simply clicking on a tint in the tint tab and clicking the (already placed) prop. The tints behave a bit like colored filters one might use on photographs in the real world.
- When using tints, keep in mind that...
- Props that have a bit of cloth or leather tend to show the tints better.
- These are called tints and not colors, because they get a wash of mist hues, not a bright color conversion for many props.
- Due to all of the above, some props also tint better than other or some tints may work better than others as well. For example, a shade like a near-neon green might not work as well on a light post with a lot of metal because the green washes the details out, yet the same green might look great applied to a stool with a cloth seat.
- Not all props can be tinted. For example, the Nature props, like the Tundra Boulder 1 can not be tinted.
- To use the tints:


Example: One prop, four tints. The top left is the base color scheme.
- Place a prop.
- Click on the Tint tab and click on a color that appeals to you.
- Finally, click on the prop. If it can be tinted, it will take on the hue of the tint you chose.
- How to remove tints:
- Click on the tint with the common No symbol
- Click on the prop
The above will return the prop to its base color scheme when placed.
- See Tint for more info.
Building Tools and Materials Tray[]


Everything you need to build a unique structure using the resources you gather is found within this section of the mega-palette. Note that to the far right are several icons of keyboard shortcuts that may be used with certain tools in this section.
Build Tools[]
The building tools are found on the far right of this section of the palette. When you are starting out, the best way to learn is to experiment by clicking on each icon and making a mess with the tools (seriously). Some tools add material, while other delete. Some let you copy and paste, while others smooth edges.
Shapes[]
Directly to the right of the main building tools you will find the shapes. Shapes are shortcuts to working with unusual shape like like wedges and polygons.
- See the Building Tools page for terminology and the basic info about these tools.
Materials Tray[]
The 'Materials Tray' is found in the near-center of build tools section of the mega-palette. It has small squares that indicate the general color and texture to expect when choosing a material.
Click on any material to switch to it or activate a tool (like the Add Tool) and hold down Alt on your keyboard to "sample" and automatically switch to a material nearby.
Summary of the Materials Tray Functions:
- All players have access to infinite, free-to-use building materials in limited textures. Most of the textures include anything you find in the natural (game) world. The free-to-use textures never need to be gathered.
- All actively gathered building materials (mined or from trees) must be refined into cut or smelted versions at a Replicator before they can be used to build.
- It allows switching between textures like wood, stone, snow, ruby, gold and so forth. All materials you have will have a number in the bottom right corner of its icon. All "free" materials have an infinity symbol (looks like a sideways 8).
- If you are unhappy with a choice you make, you can either use the Paint Tool to change what you are working on or if you already painted something, hit CTRL + Z on your keyboard to "undo" any action.
- The options can be narrowed to show only available materials you have by "checking" the Can Build box. For example, this makes it easy to see that you have 430 striped wood to use and 1,290 dirt, if those are the primary materials you are using to create a building.
- See the Materials Tray page for more detailed information.
Mesh Shapes Tab[]


The information on this page changed rapidly and may be out of date. The feature or features may still be in beta and more changes can be expected. A "Beta" section may exist to clarify any expected changes or differences. This template was updated on June 7th, 2016.
If the system or item is beyond beta, remove this BetaInfo flag. |
In Late July 2016, a new tab for Shapes was added. These are found in a tab to the far right of Build Mode. They are still the preliminary version of this new set of shapes (in testing), so players are asked to give feedback and post bugs on the Bug Tracker.
The mesh shapes include some hard-to-build shapes that can be made with the normal Building Tools, with considerable effort.
- Unlike manually-built shapes though, these shapes are can be scaled up from their base size by using the keyboard shortcuts listed on the far right of this tab.
- For example, the Cone shape can be scaled up to make a conical roof for a castle tower.
- The same cone can not be scaled down. This is because of the way the blocks (a.k.a. the programming "under" voxels) have a hard limit on the way they can be compressed before a shape "breaks".
- See Meshes for more info
Modular Build Mode[]


Highlighted for emphasis: while in Build Mode, the mega palette can be minimized/enlarged on the far right. Once minimized, the modular windows can be accessed.
Players can also open build mode a collection of "pop out" modular windows that can be moved around the screen. There is one window for each tab.
- To make modular windows:
- Toggle into Build Mode (click the tools icon, upper right or hit Tab)
- Minimize the Build Mode window
- In the bottom left of the screen are mini-tabs with the same icons as seen above. Clicking the mini-tabs will open just one section of Build mode.
To see it in action watch the Official video post by Daybreak when this feature debuted.
- Click to enlarge
")
")
")
")
")
")
Possible Bugs[]
When using the modular, compact version of Build Mode, for may need to reopen the full size User Interface (UI) window and clear any prior searches. The modular mode will not show the keywords and you can not clear it from there. For example, if you searched for candle, you would only see candles in modular mode, until you open the full sized Build Mode mega palette, delete the word, candle, and refresh the search by hitting the magnifying glass.